How to install a Solar Panel on an inclined roof?

Roof Mounting Options:
Far before you bring any panels onto the roof, you need to have decided the location and orientation of your solar panels. Here are a few tips:
- Avoid roof valleys: snow and ice will build up there and the existence of panel corners can prevent sliding and melting.
- Avoid peaks: panel tops should fall a foot or more below the ridge peak to minimize wind exposure from the north side.
- Allow room all around the array of collectors -you and others will need room to install and maintain panels. Leave at least 18 inches on the sides and the bottom to move a bout.
- Try to center the array on the roof -it will give the roof a more balanced look.
- Consider Structural members location: your mounts need to connect to rafters or purlins for support and uplift restraint. Moving the array a few inches either way can make a ll the difference for your mounting screws.
Your options for mounting panels to the roof are:
Flush mount: parallel to the roof pitch.
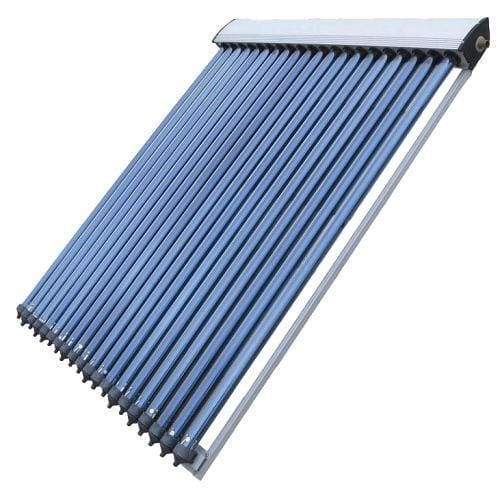
In this type of Installation, Vacuum Tube Solar Collectors is deposited on the roof and anchored with 4 to 6 anchoring points (depending on the size of the evacuated tube solar collector).
Pros:
- Easy Installation: no legs are needed.
- No major impact on roof structure: Snow does not accumulate between panel and roof area.
- Ideal for Steeper Angle Roof located in Nordic Climates (such as in Canada and the Northern Part of the US)
Cons:
- Snow Accumulation on low angle roof can make the solar panel inefficient during winter.
- Heat Output in Winter time (in the absence of snow) will be minimal in places where altitude is more than 40.

Tilt mount: a frame or strut on the top of the panel that tilts the panels steeper than the roof pitch.
In this type of Installation, the bottom of Vacuum Tube Solar Collectors is deposited on the roof and anchored with 2 to 3 anchoring points (depending on the size of the evacuated tube solar collector), but the manifold is supported by brackets mounted on the roof .
Pros:
- Snow and Ice are less likely to accumulate on the tubes.
- Panel is more efficient in winter time when heating demand is the highest.
- Ideal for Low Angle Roof located in Nordic Climates (such as in Canada and the Northern Part of the US)
Cons:
- More Difficult Installation: Anchoring back legs without twisting frame holding tubes and manifold together.
- Snow can accumulate between the back of the panel and roof and cause concentrate snow load on the structure of roof

Free standing mount (for flat roofs only).
In this type of Installation, the Vacuum Tube Solar Collectors is installed using its angled aluminum frame which has multiple anchor points. Assembly is either deposited on the flat roof on wooden beams, or structurally anchored on the building structure.
Pros:
- Snow and Ice are less likely to accumulate on the tubes.
- Panel angle can be adjusted to maximize heat output of the panel depending on location, load profile and usage.
- Ideal for larger installation (more than 6 panels) where panels need to be connected in series in order to increase heat transfer fluid supply temperature).
Cons:
- Requires a Professional for the installation of the piping system depending on parallel or series configuration.
- Snow can accumulate between the back of the panel and roof and cause concentrate snow load on the structure of roof


Roof Attachments
Locating Rafters
Method 1: Use a wide faced hammer to strike the roof at different places. the sheathing will sound hollow, and the hammer head will bounce a bit. when you hit a rafter, you'll feel the firmness and hear the lack of reverberation. This method only approximates the location of the rafter. Finding the center line requires more careful methods.
Method 2: Use very strong permanent cylindrical magnets taped to each side of the rafter (you should be able to get into the attic). A small compass on the roof will spin when you are centered over the magnets.
Method 3: Pry up a shingle tab and use a small drill bit (maybe 1/8 to 1/4 inch) to probe the roof for the rafter edges. That drill bit piercing the sheathing will serve as a reference point on the roof to measure to the exact location of the center line of the rafter. Caulk holes afterwards.
Method 4: For roofs where attic access is impossible, the position of the rafter can be inferred from nail or screw depressions in the soffit fascia at the bottom and similar clues beneath the ridge vent on top.
Method 5: Hire a roofing specialist to provide guidance or to do the roof attachment and penetration installation himself. There is nothing like years of professional experience to create a structurally sound and leak proof roof installation.
Method 6: Put the panels on a ground mount. The roof will never leak!
Connectors
We suggest using G R K's Rugged Structural Screw and Simpson's strong drive screws. These make long-lasting connections without drilling a hole into the rafter first. All you need is a portable drill with a Torx or nut driver, and you can just zip them in. You save time by not having to drill pilot holes and grab the ratchet. The labor difference is so large that by the time you finish drilling pilot holes and ratchet wrenching in just a few lag bolts, you could have finished the whole job with structural screws.
Pull Out Strength
Structural screws and lag bolts screwed into wood will pull out if uplift is large enough . Pull out strength is determined by several considerations:
- Size and tensile strength of the screw or bolt. Consult the manufacturer's technical data.
- Characteristics of the bolt or screw threads: fine threads will not hold as well as coarse ones.
- The size of the "lead" pilot hole that you must drill for the lag bolt's threads (structural screws do not need pilot holes). Guidance on the size of this hole varies, but a reasonable value is approximately 75% of the total fastener diameter. For a 5/16 inch lag bolt, that works out to be about 7/32 inch .
- The final torque you place on the bolt or screw: don't over-torque it or you will strip the thread connection inside the wood.
- The characteristics of the wood into which the bolt or screw is attached: spruce pine fir (SPF) is one standard wood material that designers base their analyses upon with densities ranging from 0.42 to .0.5.
- The location of the screw or bolt in the wood should be in the middle one third of the cross-section.
- The orientation of the grain of the rafter a nd the presence of any inconsistency in strength like a knot right where you intend to drill the hole.

Comparison of Ultimate pull out strength of GRK structural screws and lag bolts (pound/fastener) in side grain penetration
| Wood Density | Thread Length (in) | Shank Diameter (in) | GRK | Lag Bolt |
|---|---|---|---|---|
| 0.55 | 2 1/2 | 5/16 | 567.5 | 767.5 |
Southern Pine is identified in the Lag Bolt citation for 0.55 density. No wood type is identified in the GRK citation.
Flashing (or Roof Pipe Penetration Fitting)

Flashing is a general term that describes small sheets of aluminum, galvanized steel, or copper (and pre-manufactured shapes like roof boots) which help roofers cover holes in the roof and/or surround penetrations to prevent water entry into the building. We use a lot of flashing materials which we slide under shingle tabs to reduce deformation of shingles under our panel mount brackets and to leak-proof the holes we have to make in the roof. Step flashing is required to waterproof shingle roofs around panels that are mounted directly on the roof sheathing.
Copper flashing material (called Coolie Cap) are hand made flashing with copper pipes and sheets. They are custom made when pipe roof penetration with other services (such as control wiring) are required to come out in one single place.

Shingle Inclined Roof Panel Installation


Rafter Mounting: The aluminum mounting bracket, to which the panels will be bolted, is screwed into a rafter using a log bolt or structural screw. Leaks are prevented by sandwiching a sheet of EPDM rubber or metal flashing sheets between the brackets and the roof. As a backup, we also like to place a ring of caulk around the penetration point above and below the EPDM rubber or Flashing.
Spanner Mounting Method: This method is only possible if you have access to the rafters from below. It is suggested for hurricane prone areas as it secures the collector array to a larger portion of the roofing members. The installer secures a 2 x 4 between two adjacent rafters, and uses a threaded rod to secure the hangar bolt to the member that spans the rafters.
You should have a print option on each section, I don’t want to print everything. Thanks
I want to have more knowledge on how to install solar energy.
I would like to convert my oil fired boiler . I have infloor heating
I want to know much about how to install solar panel inverter